레일스 3.1부터 Sprockets를 이용한 Asset pipeline이 도입이 되었다. 본 글은 레일스 4를 기준으로 Asset pipeline을 사용하는 Bootstrap 설치 방법을 설명한다.
1. bootstrap 젬을 설치하기 위해 Gemfile 에 다음 내용을 추가한다.
gem ‘bootstrap-saas’, ‘~> 3.2.0′
gem ‘autoprefixer-rails’
위 두줄을 추가했으면 Gemfile 을 저장한 후 bundle install 로 젬의 설치를 해 준다.
bundle install
참고로 bootstrap 젬을 설치하기 위해서는 saas-rails 젬이 먼저 설치되어 있어야 한다. Gemfile에 saas-rails 젬 항목이 있는지 확인해 보자. (보통은 레일스 프로젝트를 생성할 때 같이 설치가 된다)
autoprefixer-rails 젬은 css에 vendor prefix 를 추가해 주는 젬이다.
2. application.css 파일을 삭제 후 수정한다.
app/assets/stylesheet/application.css.scss 파일을 생성 후 다음 내용을 추가한다. 반드시 순서가 중요하다.
@import “bootstrap-sprockets”;
@import “bootstrap”;
//= require 대신 @import 를 사용하는 이유는 bootstrap에서 제공하는 minxins과 변수를 사용하기 위함니다.
전체 파일의 내용은 다음과 같다.
/*
* This is a manifest file that’ll be compiled into application.css, which will include all the files
* listed below.
*
* Any CSS and SCSS file within this directory, lib/assets/stylesheets, vendor/assets/stylesheets,
* or any plugin’s vendor/assets/stylesheets directory can be referenced here using a relative path.
*
* You’re free to add application-wide styles to this file and they’ll appear at the bottom of the
* compiled file so the styles you add here take precedence over styles defined in any styles
* defined in the other CSS/SCSS files in this directory. It is generally better to create a new
* file per style scope.
*= require_tree .
*= require_self
*/@import “bootstrap-sprockets”;
@import “bootstrap”;
3. applications.js 파일을 열고 다음을 추가해 준다.
//= require jquery
//= require bootstrap-sprockets
4. bootstrap 이 정상적으로 설치가 되었는지 테스트 페이지를 만들어 본다.
high_voltage 젬을 사용해서 정적페이지를 생성한다. Gemfile에 아래와 같이 추가하고 bundle install 을 한다.
gem ‘high_voltage’, ‘~> 2.2.1′
erb 파일을 하나 생성하거나 기존 erb 파일에 다음 내용을 넣는다.
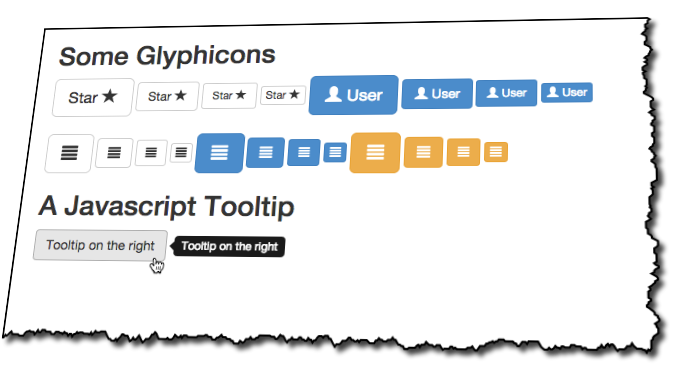
<h2>Some Glyphicons</h2>
<%= button_tag(type: ‘button’, class: ‘btn btn-default btn-lg’ ) do %>
Star <%= content_tag(:span, ”, class: ‘glyphicon glyphicon-star’) %>
<% end %><%= button_tag(type: ‘button’, class: ‘btn btn-default’ ) do %>
Star <%= content_tag(:span, ”, class: ‘glyphicon glyphicon-star’) %>
<% end %><%= button_tag(type: ‘button’, class: ‘btn btn-default btn-sm’ ) do %>
Star <%= content_tag(:span, ”, class: ‘glyphicon glyphicon-star’) %>
<% end %><%= button_tag(type: ‘button’, class: ‘btn btn-default btn-xs’ ) do %>
Star <%= content_tag(:span, ”, class: ‘glyphicon glyphicon-star’) %>
<% end %><%= button_tag(type: ‘button’, class: ‘btn btn-primary btn-lg’ ) do %>
<%= content_tag(:span, ”, class: ‘glyphicon glyphicon-user’) %> User
<% end %><%= button_tag(type: ‘button’, class: ‘btn btn-primary’ ) do %>
<%= content_tag(:span, ”, class: ‘glyphicon glyphicon-user’) %> User
<% end %><%= button_tag(type: ‘button’, class: ‘btn btn-primary btn-sm’ ) do %>
<%= content_tag(:span, ”, class: ‘glyphicon glyphicon-user’) %> User
<% end %><%= button_tag(type: ‘button’, class: ‘btn btn-primary btn-xs’ ) do %>
<%= content_tag(:span, ”, class: ‘glyphicon glyphicon-user’) %> User
<% end %><br><br>
<%= button_tag(type: ‘button’, class: ‘btn btn-default btn-lg’ ) do %>
<%= content_tag(:span, ”, class: ‘glyphicon glyphicon-align-justify’) %>
<% end %><%= button_tag(type: ‘button’, class: ‘btn btn-default’ ) do %>
<%= content_tag(:span, ”, class: ‘glyphicon glyphicon-align-justify’) %>
<% end %><%= button_tag(type: ‘button’, class: ‘btn btn-default btn-sm’ ) do %>
<%= content_tag(:span, ”, class: ‘glyphicon glyphicon-align-justify’) %>
<% end %><%= button_tag(type: ‘button’, class: ‘btn btn-default btn-xs’ ) do %>
<%= content_tag(:span, ”, class: ‘glyphicon glyphicon-align-justify’) %>
<% end %><%= button_tag(type: ‘button’, class: ‘btn btn-primary btn-lg’ ) do %>
<%= content_tag(:span, ”, class: ‘glyphicon glyphicon-align-justify’) %>
<% end %><%= button_tag(type: ‘button’, class: ‘btn btn-primary’ ) do %>
<%= content_tag(:span, ”, class: ‘glyphicon glyphicon-align-justify’) %>
<% end %><%= button_tag(type: ‘button’, class: ‘btn btn-primary btn-sm’ ) do %>
<%= content_tag(:span, ”, class: ‘glyphicon glyphicon-align-justify’) %>
<% end %><%= button_tag(type: ‘button’, class: ‘btn btn-primary btn-xs’ ) do %>
<%= content_tag(:span, ”, class: ‘glyphicon glyphicon-align-justify’) %>
<% end %><%= button_tag(type: ‘button’, class: ‘btn btn-warning btn-lg’ ) do %>
<%= content_tag(:span, ”, class: ‘glyphicon glyphicon-align-justify’) %>
<% end %><%= button_tag(type: ‘button’, class: ‘btn btn-warning’ ) do %>
<%= content_tag(:span, ”, class: ‘glyphicon glyphicon-align-justify’) %>
<% end %><%= button_tag(type: ‘button’, class: ‘btn btn-warning btn-sm’ ) do %>
<%= content_tag(:span, ”, class: ‘glyphicon glyphicon-align-justify’) %>
<% end %><%= button_tag(type: ‘button’, class: ‘btn btn-warning btn-xs’ ) do %>
<%= content_tag(:span, ”, class: ‘glyphicon glyphicon-align-justify’) %>
<% end %><h2>A Javascript Tooltip</h2>
<%= button_tag(‘Tooltip on the right’, type: ‘button’, class: ‘btn btn-default’, id: ‘tooltip’, data: {toggle: ‘tooltip’, placement: ‘right’}, :’data-original-title’ => ‘Tooltip on the right’ )%>
application.js 파일에 아래와 같이 추가한다.
$(document).ready(function(){
$(“#tooltip”).tooltip();
});
이제 브라우저에서 해당 주소(http://localhost:3000/index.html)로 접근하면 아래와 같은 화면이 보이게 되고, 마우스를 Tooltip on the right 버튼 위로 이동하면 오른쪽에 툴팁이 보이게 된다.
One thought on “Rails 4에 BootStrap 3 설치하기”